How to shoot lightning
Text/Jetty

Shooting equipment: Sony Micro single A7R2 / old frog 12mmF2.8 lens
Shooting parameters: shutter 25 seconds / aperture F8 / ISO200 / focus infinity / time-lapse interval 1 second shooting location: Beijing Pinggu Jinhai Lake
01. How can I seize the opportunity to capture the fleeting moment?
My solution is this. First of all, I need the camera to be in a state of constant shooting so that I can catch lightning. Shooting in the time-lapse photography mode, setting the shooting interval to the shortest one second, in this case, I am constantly shooting, only the second interval may be missed, but the chance of shooting has greatly increased. Then select the location and direction of the lightning, set up the tripod, and select the phase diagram.
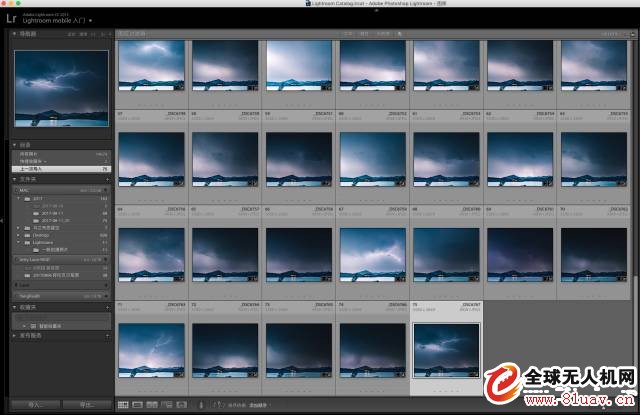
(A total of 150 photos were taken in a row, which took 70 minutes and about 8-10 shots were taken)
02, how to set the exposure parameters?
Here we must judge according to the actual situation, the appearance of lightning will make the picture have a very bright light value in an instant, but because it will not always shine, it just lights up instantly, which is similar to the principle of the flash used in our camera. Therefore, when I was exposed, I did not refer to the accurate exposure of lightning, but according to the prospect. Taking this photo as an example, I used the light of the hotel in the lake and the mountain as the standard to ensure that it would not be exposed. After many test shots, I determined the exposure parameters.
The order in which the exposure parameters are determined is as follows:
ISO: 200 should actually use 100, so the noise is the least, but the sensitivity of 200 will not be too different.
Aperture: F8 This value is the aperture of the lens with the sharpest sharpness. In this photo, we don't need background blur. Because it is shot on a tripod, the screen will not move except lightning, so the shutter can be set very slowly. In this way, the F8 aperture is preferred to get better sharpness and greater depth of field.
Shutter: 25 seconds, the shutter is finally set. Since the ISO and aperture have been determined in the front, how to set the shutter, according to the experience set to 10 seconds, test shot, found that the exposure is insufficient, the foreground lake and mountains are very dark, so increase to 20 seconds, the basic exposure Normal. In order to have more details in the later stage, (because if you have insufficient exposure in the early stage, the later use of Lightroom to brighten the dark part will produce a lot of noise. So simply increase the amount of previous exposure.) Finally set to 25 seconds.
03, set the focus focus
Generally speaking, this kind of scenery shooting can directly focus on the farthest end, especially at night shooting, auto focus will generally be invalid, so set the focus mode to manual, then turn the focus ring and put it directly to the far end. .
However, it should be noted that in general, screwing directly to the farthest end is often a bit imaginary. I usually turn on the peak focus function, zoom in on the display, and then slightly turn the focus ring back a little. Then take a test shot, zoom in and see if the focus is accurate.
04, set the time delay photography mode
Set the camera to the time-lapse photography mode, or use the shutter release to achieve this function. It should be noted here that the delay interval should be set to the absolute interval, that is, the interval after the completion of a photo, without the shutter's own time. Then set the interval to the shortest, my Sony A7R2 app comes with a minimum interval of 1 second. In addition, pay attention to a few shots, see if the SD card has enough speed to save the photos, and then take a picture.
Finally, shooting lightning is a matter of luck. My method only increases your chances of luck. The composition is selected in advance, and continuous shooting is possible. Shooting lightning should not be half-hearted. If you see lightning elsewhere, you can change your position at will, because it is too uncertain, so you can gain something. It is recommended to shoot with a wide-angle or super wide-angle lens.
OK, you can start shooting now. Maybe the environment you are in will have slightly different shooting parameters, but it doesn't matter. Let's start shooting immediately. Experience is your best teacher. I am just a photography dictionary.
"How to shoot TA" is a new column. You are welcome to submit your own work to us (you can submit it in the flyer's public menu) and then do some brief shooting instructions, which can help more friends who love photography. . You can shoot aerial photography or SLR, we will help everyone together.
Flying hand course subscription
Jetty will regularly update the aerial photography course, and interested friends can identify us on the right QR code.

Text/Jetty
Shooting equipment: Sony Micro single A7R2 / old frog 12mmF2.8 lens
Shooting parameters: shutter 25 seconds / aperture F8 / ISO200 / focus infinity / time-lapse interval 1 second shooting location: Beijing Pinggu Jinhai Lake
01. How can I seize the opportunity to capture the fleeting moment?
My solution is this. First of all, I need the camera to be in a state of constant shooting so that I can catch lightning. Shooting in the time-lapse photography mode, setting the shooting interval to the shortest one second, in this case, I am constantly shooting, only the second interval may be missed, but the chance of shooting has greatly increased. Then select the location and direction of the lightning, set up the tripod, and select the phase diagram.
(A total of 150 photos were taken in a row, which took 70 minutes and about 8-10 shots were taken)
02, how to set the exposure parameters?
Here we must judge according to the actual situation, the appearance of lightning will make the picture have a very bright light value in an instant, but because it will not always shine, it just lights up instantly, which is similar to the principle of the flash used in our camera. Therefore, when I was exposed, I did not refer to the accurate exposure of lightning, but according to the prospect. Taking this photo as an example, I used the light of the hotel in the lake and the mountain as the standard to ensure that it would not be exposed. After many test shots, I determined the exposure parameters.
The order in which the exposure parameters are determined is as follows:
ISO: 200 should actually use 100, so the noise is the least, but the sensitivity of 200 will not be too different.
Aperture: F8 This value is the aperture of the lens with the sharpest sharpness. In this photo, we don't need background blur. Because it is shot on a tripod, the screen will not move except lightning, so the shutter can be set very slowly. In this way, the F8 aperture is preferred to get better sharpness and greater depth of field.
Shutter: 25 seconds, the shutter is finally set. Since the ISO and aperture have been determined in the front, how to set the shutter, according to the experience set to 10 seconds, test shot, found that the exposure is insufficient, the foreground lake and mountains are very dark, so increase to 20 seconds, the basic exposure Normal. In order to have more details in the later stage, (because if you have insufficient exposure in the early stage, the later use of Lightroom to brighten the dark part will produce a lot of noise. So simply increase the amount of previous exposure.) Finally set to 25 seconds.
03, set the focus focus
Generally speaking, this kind of scenery shooting can directly focus on the farthest end, especially at night shooting, auto focus will generally be invalid, so set the focus mode to manual, then turn the focus ring and put it directly to the far end. .
However, it should be noted that in general, screwing directly to the farthest end is often a bit imaginary. I usually turn on the peak focus function, zoom in on the display, and then slightly turn the focus ring back a little. Then take a test shot, zoom in and see if the focus is accurate.
04, set the time delay photography mode
Set the camera to the time-lapse photography mode, or use the shutter release to achieve this function. It should be noted here that the delay interval should be set to the absolute interval, that is, the interval after the completion of a photo, without the shutter's own time. Then set the interval to the shortest, my Sony A7R2 app comes with a minimum interval of 1 second. In addition, pay attention to a few shots, see if the SD card has enough speed to save the photos, and then take a picture.
Finally, shooting lightning is a matter of luck. My method only increases your chances of luck. The composition is selected in advance, and continuous shooting is possible. Shooting lightning should not be half-hearted. If you see lightning elsewhere, you can change your position at will, because it is too uncertain, so you can gain something. It is recommended to shoot with a wide-angle or super wide-angle lens.
OK, you can start shooting now. Maybe the environment you are in will have slightly different shooting parameters, but it doesn't matter. Let's start shooting immediately. Experience is your best teacher. I am just a photography dictionary.
"How to shoot TA" is a new column. You are welcome to submit your own work to us (you can submit it in the flyer's public menu) and then do some brief shooting instructions, which can help more friends who love photography. . You can shoot aerial photography or SLR, we will help everyone together.
Flying hand course subscription
Jetty will regularly update the aerial photography course, and interested friends can identify us on the right QR code.
KNB2-63 Miniature Circuit Breaker
KNB2-63 Mini Circuit breakers, also named as the air switch which have a short for arc extinguishing device. It is a switch role, and also is a automatic protection of low-voltage electrical distribution. Its role is equivalent to the combination of switch. Fuse. Thermal Relay and other electrical components. It mainly used for short circuit and overload protection. Generally, According to the poles, mini Circuit breaker can be divided into 1P , 1P+N , 2P, 3P and 4P.
KNB2-63 Miniature Circuit Breaker,Electronics Miniature Circuits Breaker,Automatic Miniature Circuit Breaker,Mini Circuit Breaker
Wenzhou Korlen Electric Appliances Co., Ltd. , https://www.zjaccontactor.com